Eight Tips For Patent Drawings
Patent drawings are a critical part of a patent and you need to know how to make them correctly if you are going to write your own patent. When I am doing patent research the first thing I will look at are the drawings. Why? Most of the time you can tell in an instant by looking at the drawings if a specific patent is going to be applicable to your idea.
The drawings tell 80% of the story and the description tells the rest. This concept applies to your patent as well. Patent drawings are required in all patents if the subject matter can be illustrated and if a visual image of the invention is required for its understanding. This covers nearly every physical invention.
The patent office specifies certain requirements that must be met for all patent drawings. These include:
- Using only black ink or very limited color
- Show every feature that is in the claims
- Use only number call outs, do not name parts on the drawing
- Paper Size Requirement: 21.6 cm X 27.9 cm
- Margin Sizes: Top and Left: 2.5 cm, right: 1.5 cm, bottom: 1.0 cm
These are not suggestions. These are rules that must be followed for your drawing to be accepted by the patent office. I have had drawings rejected before because a margin was .25 cm too small. The drawing had to be reformatted and re submitted for the patent to move forward. There are a few other more subjective requirements you should follow as well.
- Draw everything to scale
- Put several drawings on one page
- No folds, creases or erasures on the paper
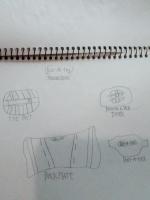
Below is the first patent drawing that I personally made and submitted
to the patent office. I followed all of the guidelines but...I could
have and probably should have done better. Many of the components are
very crude and it is difficult to determine what they are without
studying the specification.
For instance the drawing shows a
motor and gears and a spring along with some blocks that represent
electrical components. It would have been much better to illustrate them
as 3D objects with more detail. If you are not an artist, I certainly
am not, it is probably best to get a professional to make these drawings
for you. They should not cost more than 100 USD in most cases. Most of
the time it is money well spent.

The things I did correctly included calling out each component for easy reference in the specification and using numbered call outs. In the end these drawings did the job and the patent was issued. That counts the most but always be as clear as possible and make it easy for the person reading your patent.
Return to How To Get A Patent from Patent Drawings
Return to Home Page from Patent Drawings
Recent Articles
-
Don't Dare Underwear
Jun 19, 24 11:03 AM
 I created a new concept of the boxer briefs with the pocket. They are specifically designed to carry a condom. Joining the fight against infectious diseases
 -
Rol-A-Flex: Platinum Edition
Apr 08, 24 11:24 AM
 Hi My Name Is Malcolm Washington, I'm 19 Years Old And My Invention Is A New And Important Rol-A-Flex AB Belt Called Rol-A-Flex Platinum Edition, It's
 -
SENSE AWARE
Mar 26, 24 08:00 AM
Sense Aware represents the latest assistive technology project designed to improve safety and independence for the disabled. At its core is the Arduino